Virtual Machines
With the module 'VMs' in the 1A-manager you can manage virtual machines (VMs). A VM is a guest computer on a server which runs on mimiced "hardware". The VM can do everything a physical computer can do.
VMs can offer a solution when essential business software can't be installed on the 1A-server. This can happen when the software can only run on another operating system. Savings can be another reason: you don't need a separate physical server for a VM, which saves you power and maintenance.
To be able to boot from a live-CD or to install an operating system on a VM, you often need a physical installation medium (for example a CD, DVD or USB-drive). This medium can be converted to an image which can be connected to a VM with the VM media share. Your 1A-partner can help you with converting a physical medium to a useable image.
Requirements
To complete this manual, you will need:
- A license with virtualisation enabled on your 1A-server. No virtualisation yet? Please contact your 1A-partner
- A computer connected to your 1A-server
- A username and password for the 1A-manager
- A webbrowser
Steps
Open the module VMs
- Go to
addons→VMs
Create or modify a VM
- Please contact your 1A-partner to do this
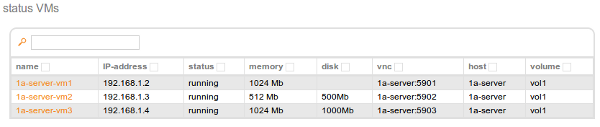
See the properties of a VM
- Go to
status VMs - Click on the VM you want to see

Turn a VM on or off
- Go to
status VMs - Click on the VM you want to turn on or off
- Go to
actions - Click the button

Use the VM media share
- Go to
VM media share - Check
yesatVM media share actief - Click
save - Go to the module groups and add users who are allowed to use the share to the group
vm_media - Connect to the share indicated at
VM media sharename

Start the VM with an image from the media share
- Go to
status VMs - Click on the VM you want to start
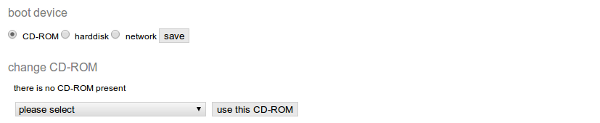
- Go to
boot device - Check
CD-ROM - Click
save - Go to
change CD-ROM - Select the image you want to boot from
- Click
use this CD-ROM - Power on the VM
Connect to the VM with VNC
- Click
allow VNC from LAN(this will change toblock VNC from LAN). This setting can only be changed when the VM is turned on. - Enter a password of your choosing
- Click
set VNC password - Connect with a VNC client, for example UltraVNC
- If you want to be able to log in without a VNC password, you can do this bij clicking
remove VNC password
