Telephony
With the module telephony in the 1A-manager you can manage 1A First Alternative Voice-over-IP-telephony.
This module together with the 1A-phonetool will give you complete control over telephony in your company. You can configure users, phones, callgroups and office hours. The 1A-phonetool will give you an overview of users, phones and settings.
Requirements
To complete this manual, you will need:
- Telephony on your 1A-server. No telephony yet? Please contact your 1A-partner.
- A computer connected to your 1A-server
- A username and password for the 1A-manager
- A webbrowser
Usage
1
Settings: external callers - actions for incoming calls
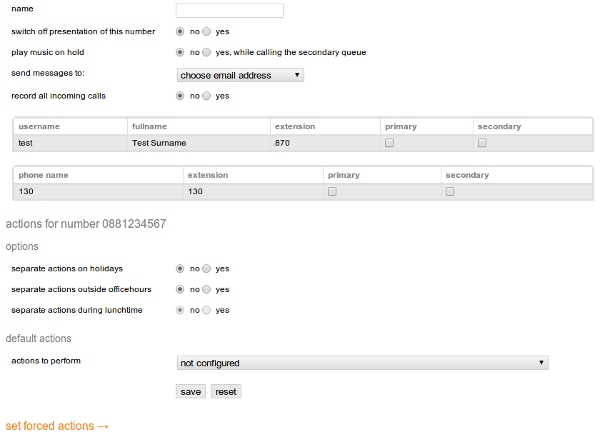
- For every Incoming Line you can configure how incoming calls will be handled. Several different actions can be performed sequentially. These actions can be configured in the settings of each Incoming Line:
- IVR menu: An IVR menu can be the first action, you can have the caller choose to be connected to a specific department in the company.
- Ring phones: This action will make the indicated phones ring for the incoming call. The group can be selected from phones and telephony-users.
- Call-queue with music-on-hold: This action will make the indicated phones ring for the incoming call, while the caller hears music-on-hold.
- Voicemail: This action will connect the caller to voicemail. The voicemail can be configured to allow the caller to leave a message.
- Forward: This action will forward the incoming call to a different (external) number. This number can be configured through the 1A-manager.
2
Settings: external callers - different actions for different times or days
- For every Incoming Line there are five availability-statuses, for every availability-status you can configure a new set of actions for incoming calls. These actions can be configured in the settings of each Incoming Line:
- You can configure per Incoming Line which of the availability-statuses you want to use.
- When Openinghours, Lunchtimes and Holidays are defined, the availability-status can switch automatically. It is also possible to force the phone-system to Daymode, Nightmode or Lunchmode manually.
- Daymode: Within Openinghours the 'default actions' for this Incoming Line are active. (see chapter 'actions for incoming calls' above)
- Nightmode: Outside Openinghours different actions can be configured. A separate message text can be configured for action "Voicemail" during nightmode.
- Lunchmode: Lunchtime actions can be configured separately from Daymode and Nightmode.
- Holidays: Holidays can be defined in the 1A-manager, you can decide which holidays are active for your phone-system. Actions on Holidays can be configured separately from the in daymode, nightmode or lunchmode.
- Forced Action: During this status only one separate action will be used, this is instead of any of the other configured availability-statuses. Available actions are "Voicemail" or "Forward to an external number". This status and the action can be set from the 1A-manager and the Phonetool tab "LINE".
3
Special functions: Company specific messages
- Company specific messages can be recorded using a phone and Phonetool tab Global.
This option uses your internal phone, you will be assisted through IVR. - After recording the messages you can configure them through the Phonetool and the 1A-manager.
4
Settings: Statuslights on a phone
- Busy Lamp Fields are available for several functions in 1A-telephony, for example:
- For phones BLF is available on the phone's internal number
- For de conference-rooms BLF is available on the conference-room's internal number 107, 108 & 109
- For parked calls BLF is available on parkingspots 101 to 106
- For ringing incoming calls in the primary or secundary groep BLF is available on #8#31152629648#1 and #8#31152629648#2
- For forced daymode / naghtmode BLF is available on "day" en "night"
Steps
1
Open the module telephony
- Go to
telephony→telephony
2
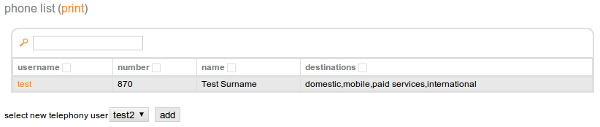
Create a telephony user
- Go to
phone list - Go to
select new telephony user - Select a new telephony user
- Click
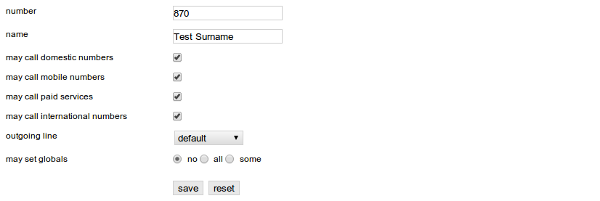
add - Adjust the settings as desired
- Click
save
3
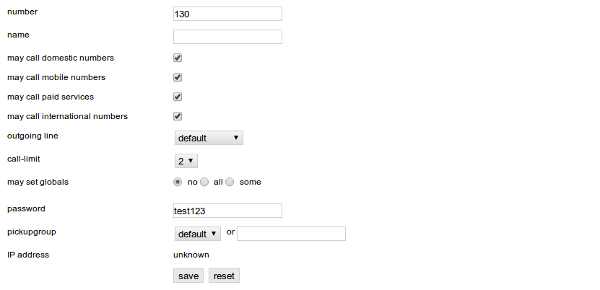
Modify a telephony user
- Go to
phone list - Click on the user you want to modify
- Adjust the settings as desired
- Click
save
4
Remove a telephony user
- Go to
phone list - Click on the user you want to remove
- Check
remove this user - Click
remove

5
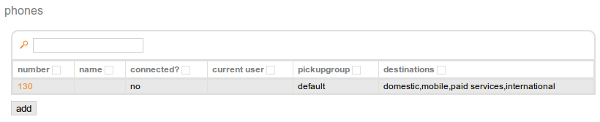
Add a phone
- Go to
phones - Click
add - Adjust the settings as desired
- Click
save
6
Modify a phone
- Go to
phones - Click on the phone you want to modify
- Adjust the settings as desired
- Click
save
7
Remove a phone
- Go to
phones - Click on the phone you want to remove
- Ga naar
toestellen - Check
remove this phone - Click
remove

8
Add or remove a callgroup
- Please contact your 1A-partner to do this
9
Change a callgroup
- Go to
callgroups - Click on the number you want to modify
- Adjust the settings as desired
- Click
save
10
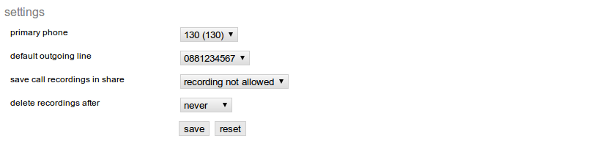
Change settings
- Go to
settings - Adjust the settings as desired
- Click
save
11
Change office hours
- Go to
office hours - Click on the day you want to modify
- Adjust the settings as desired
- Click
save

12
View and manage calls
- Click
calls - If you want to terminate a call, click
hangup

13
Listen to and manage music on hold
- Click
music on hold - Click
playto listen to a music file. With the square in the column header you can pause the playback. - Click
deleteto remove a music file

14
Add music on hold
- Click
music on hold - Click the file chooser at
file - Choose the music file to import (accepts MP3 and WAV files)
- Click
add

15
Add holidays
- Click
manage holidays - Enter a
single dayor aperiod - Click
add

16
Remove holidays
- Click
manage holidays - Click
removebehind the day or period you want to remove

17
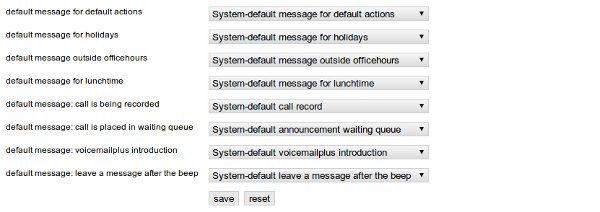
Configure default messages
- Click
configure default messages - Adjust the settings as desired
- Click
save
18
Creating and changing message texts
- See our manual VoIP: using the Phonetool, Tab "Global" under the headings "Creating message texts" and "Changing message texts"
19
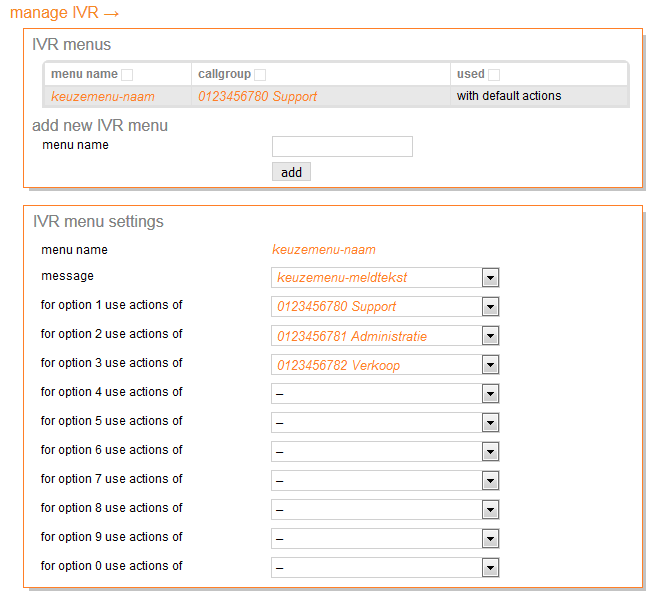
Creating and activating IVR
- Click "
manage IVR" - In field "
menu name", enter a name for this IVR menu and click button "add" - In the IVR menu setings:
- In field "
message", select the message text that describes the choices to the caller - In field "
for option 1 use actions of", select the incoming line that contains the actions that should be executed when the caller chooses "1" - In field "
for option 2 use actions of", select the incoming line that contains the actions that should be executed when the caller chooses "2" - Configure the desired choices for this IVR menu, fields for unused choices may be left empty
- Open the properties of the Incoming Line
- Activate option "
enable IVR" and select the desired IVR menu